Get OpenRMF® OSS Running Behind HTTPS
There are a few steps here to make this work:
- run
./stop.shto stop the software stack - take a good backup / snapshot of your setup
- update Keycloak for Valid URI entries
- generate your server certificate
- combine your server cert and CA cert into a bundle
- get your unencrypted server key
- setup the
nginx.conffile to listen for 8443 with proper cert paths - setup Keycloak to pass to internal KC behind NGINX over HTTPS
- run the
openrmf-webon port 8443 to match the NGINX configuration - run
./start.shto start the software stack - ensure the
openrmf-webis working correctly withdocker logs openrmf-weband looking for errors
Step 1 – Stop OpenRMF® OSS and take a good backup/snapshot
The first step always before you update any configuration, is to back this current one up. So run ./stop.sh and do that.
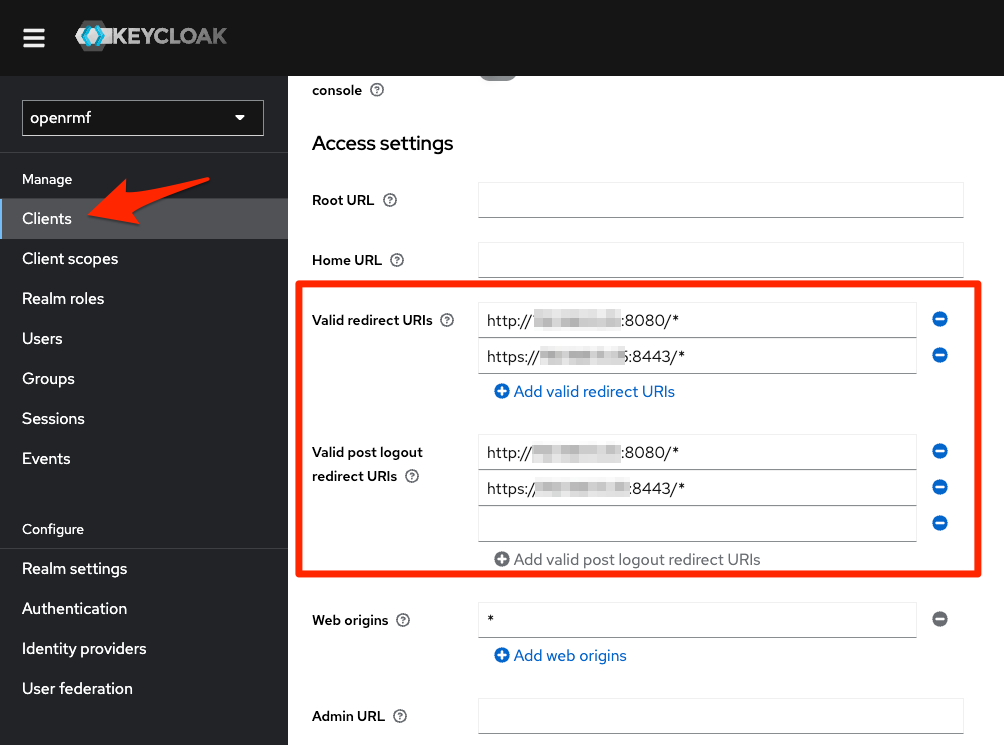
Step 2 – Allow Keycloak HTTPS Valid Redirect URIs
Now go back into the Keycloak setup for the openrmf realm and go to Clients. Then click the openrmf client.
Under the Valid redirect URI and the post logout URI add one for your same IP/DNS, but use https and end it with :8443/* for the secure port. Then click the “Add valid URI” link underneath where you enter them to put them in there.
Click Save at the bottom to save those settings and allow HTTPS now. It is easier to do this first then try to remember later.
Step 3 – Generate your server certificate
There are articles below on how you setup a certificate, mount into NGINX, etc. so I will not bore you with that. You need to generate one to do HTTPS of course. You can do the normal generate CSR, submit, get it back, get the CA crt and your crt and private key and make it fully operational. OR for now, you can do a self-signed cert.
We will do the latter here for the example.
openssl req -x509 -out myserver.crt -keyout myserver.key -newkey rsa:2048 -nodes -sha256 -subj '/CN=192.168.1.25' -extensions EXT -config <( printf "[dn]\nCN=OpenRMF OSS\n[req]\ndistinguished_name = dn\n[EXT]\nsubjectAltName=DNS:192.168.1.25\nkeyUsage=digitalSignature\nextendedKeyUsage=serverAuth")
You will get output something like this:
Generating a 2048 bit RSA private key
...........................+++++
.+++++
writing new private key to 'myserver.key'
-----
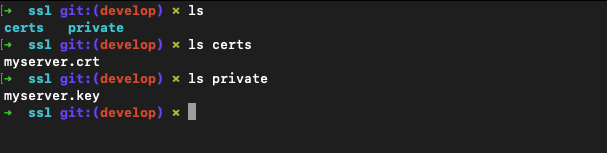
In this example you have a myserver.crt and a myserver.key file.
Step 4 – Move the files into an ssl/ folder
In the root of your OpenRMF® OSS folder, make an ssl directory and certs and private subdirectories under that. We will reference these in our YML and nginx.conf file soon.
Move the .crt file into ./ssl/certs/ and the .key file into ./ssl/private/ as shown below.
If you are going to use a CA cert and your server SSL cert, you will need to put them into a single file to use for the hierarchy that NGINX can reference and use. See below for an example and make sure the order is correct. See the links near the end of this for other references to how you can setup NGINX and HTTPS.
cat ./ssl/certs/server.crt ./ssl/certs/ca.cert.crt > ./ssl/certs/servercert_bundle.crt
Step 5 – Generate the Diffie-Hellman (DH) Group dhparam File
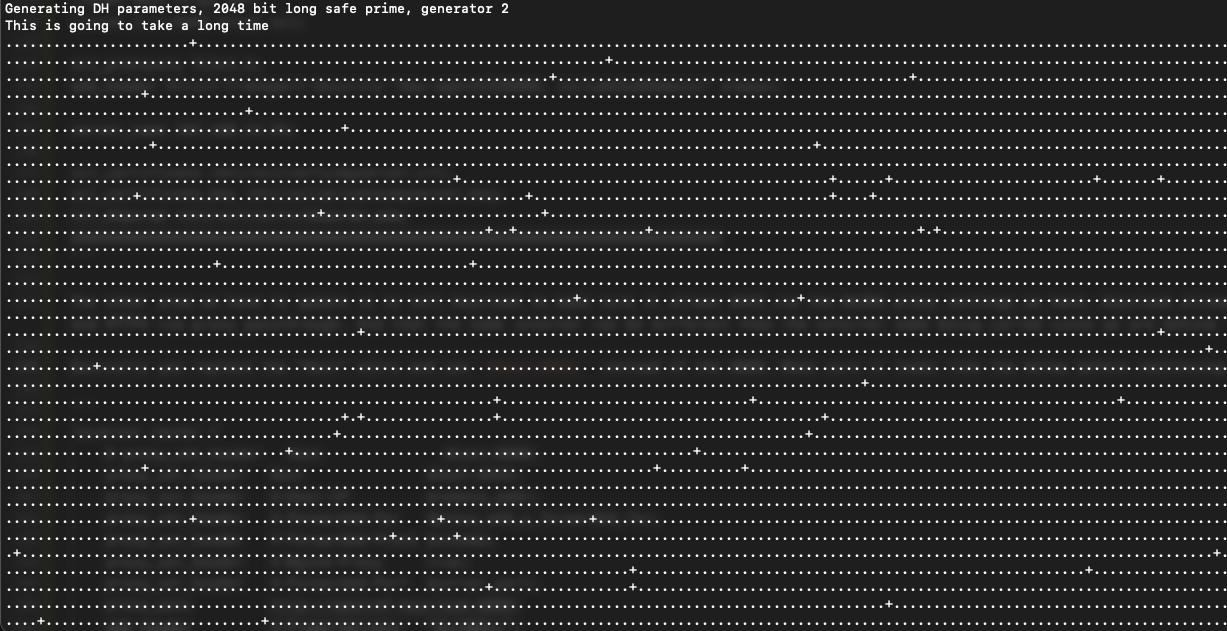
In the root of your OpenRMF® OSS directory, run the following command to generate the file we will reference for stronger security in our nginx.conf file.
openssl dhparam -out ./ssl/certs/dhparam.pem 2048
The screen will look like this for a while and then you will see your file.
Note that on some REL 8 and other Linux boxes, you may have to do something like this to get the same file. Search for your OS to get it right. Or use the genpkey command to get something similar and test that.
openssl dhparam -out ./ssl/certs/dhparam.pem -text -5 2048
Step 6 – Make sure read permissions are on all certificate files
Run the following (or equivalent) command from the root OpenRMF OSS folder to make sure permissions are correct:
chmod -R 755 ssl
Step 7 – Update the docker-compose.yml file for HTTPS
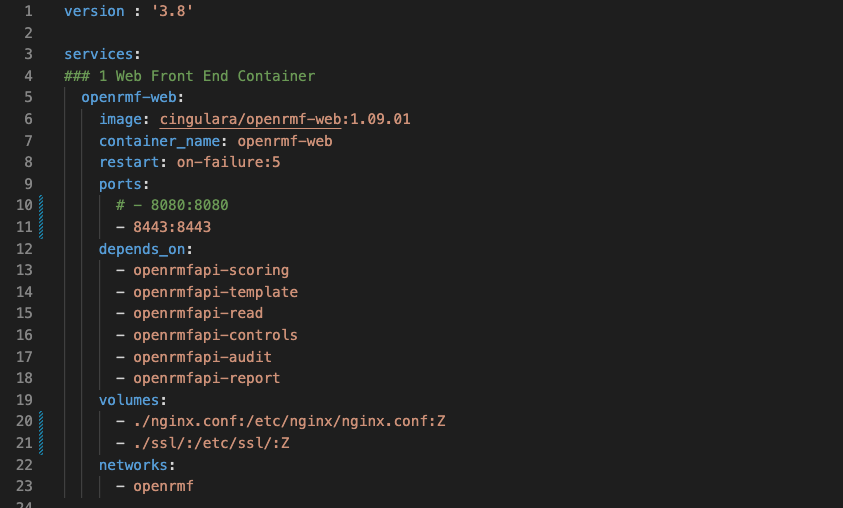
In your docker-compose.yml file you need to setup the top openrmf-web YML area to look like the below. Note that the internal and external port will be ` 8443 ` and there is a volume mount of ` ./ssl/ ` in there as well. This makes sure the web starts on port 8443 that will match nginx.conf shortly and exposes the same. And that you can reference the certificate and key information in the setup when we restart with full HTTPS support.
  openrmf-web:
    image: cingulara/openrmf-web:1.09.01
    container_name: openrmf-web
    restart: on-failure:5
    ports:
      # - 8080:8080
      - 8443:8443
    depends_on:
      - openrmfapi-scoring
      - openrmfapi-template
      - openrmfapi-read
      - openrmfapi-controls
      - openrmfapi-audit
      - openrmfapi-report
    volumes:
      - ./nginx.conf:/etc/nginx/nginx.conf:Z
      - ./ssl/:/etc/ssl/:Z
    networks:
      - openrmf
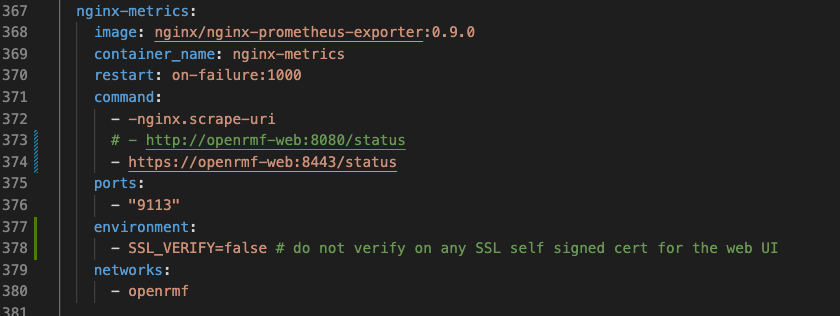
Also setup the nginx-metrics area to point to the new openrmf-web:8443/ internal path and if you are using a self-signed cert or non-Internet type of main Certificate Authority you may need that environment: section with SSL_VERIFY=false as well.
  nginx-metrics:
    image: nginx/nginx-prometheus-exporter:0.9.0
    container_name: nginx-metrics
    restart: on-failure:1000
    command:
      - -nginx.scrape-uri
      # - http://openrmf-web:8080/status
      - https://openrmf-web:8443/status
    ports:
      - "9113"
    environment:
      - SSL_VERIFY=false # do not verify on any SSL self signed cert for the web UI
    networks:
      - openrmf
Step 8 – setup NGINX configuration for HTTPS
In the nginx.conf file where it has ` listen 8080; replace that with the below information. It will replace that 8080 line and be just before the root /usr/share/nginx/html; line. This tells the openrmf-web` container that is running the NGINX proxy and the OpenRMF® OSS web UI to run on HTTPS over 8443 with the certificate files you just made.
Of course replace xxx.xxx.xxx.xxx below for the server_name with your IP or DNS name.
# listen 8080;

###########################################################################
listen 8443 http2 ssl;
listen [::]:8443 http2 ssl;

ssl_protocols TLSv1.2;
add_header Strict-Transport-Security "max-age=31536000; includeSubDomains" always;

server_name xxx.xxx.xxx.xxx;

ssl_certificate /etc/ssl/certs/myserver.crt;
ssl_certificate_key /etc/ssl/private/myserver.key;
ssl_dhparam /etc/ssl/certs/dhparam.pem;
###########################################################################
The other area we have to update is to tell Keycloak to make sure it allows 8443 via the NGINX proxy settings we have. Keycloak already has the ENV to allow HTTP and HTTPS via proxy passthrough. And that the name internal can be different than the external name being called since we are behind the NGINX proxy.
Basically you replace the “Host” entry and use $host:8443; instead of the 8080. Make sure it looks like the below before continuing.
location /auth/ {
    # proxy_set_header   Host              $host:8080;
    proxy_set_header   Host              $host:8443;
    proxy_set_header   X-Real-IP         $remote_addr;
    proxy_set_header   X-Forwarded-For   $proxy_add_x_forwarded_for;
    proxy_set_header   X-Forwarded-Proto $scheme;
    proxy_set_header   X-NginX-Proxy     true;
    proxy_set_header   X-Forwarded-Port  $server_port;
    proxy_pass         http://openrmf-keycloak:8080;
    add_header         X-Frame-Options   "ALLOWALL";
}
Step 9 – update your .env file
Now that all the HTTPS stuff is set we need to update the ` .env ` file that references the JWTAUTHORITY for validating tokens from Keycloak passed into OpenRMF® OSS. To do that replace http with https and replace 8080 with 8443 as shown below. The xxx.xxx.xxx.xxx will be your IP or DNS you specified earlier when running under HTTP.
JWTAUTHORITY=https://xxx.xxx.xxx.xxx:8443/auth/realms/openrmf
JWTCLIENT=openrmf
Step 10 – restart the OpenRMF® OSS Stack
With all that now done in the docker-compose, nginx.conf, and .env files you can stop and restart the stack.
Run ./stop.sh and let it all power down. Then run ./start.sh and let it all come back up.
You can run the docker logs openrmf-web and docker logs openrmf-keycloak to view logs and make sure they are starting up, permissions are correct and nothing is choking. Also run docker ps to make sure all the containers are running.
Note substitute
podmanfordockerif you are using a Podman 4.x setup.
Step 11 – Log in to OpenRMF® OSS
After giving it a couple minutes to restart and get everything connnected…
In a browser tab go to that new HTTPS URL you setup enter your URL https://<ip-address-or-dns>:8080/ and you should get the same login image below.
Log in with that initial application administrator login/pwd combination and you should see the main page of OpenRMF® OSS ready for you behind HTTPS!
If you used a self-signed certificate you may have to say that “accept certificate” or add it to your allowed HTTPS certs to continue. That is up to you and how you configured your HTTPS setup.
Generating a Certificate
https://nickolaskraus.org/articles/how-to-create-a-self-signed-certificate-for-nginx-on-macos/
https://www.digitalocean.com/community/tutorials/how-to-create-a-self-signed-ssl-certificate-for-nginx-on-centos-7
https://www.digitalocean.com/community/tutorials/how-to-create-a-self-signed-ssl-certificate-for-nginx-in-ubuntu-16-04
Mounting the Certificates into the NGINX Container
https://medium.com/faun/setting-up-ssl-certificates-for-nginx-in-docker-environ-e7eec5ebb418